6 min to read
Installing Sitecore Experience Platform 9.0

SitecoreSym finished last week and now Sitecore Experience Platform 9.0 initial release is availabe. As a full stack developer am always curious about new things so the first thing I did was to download all the files and try to install the thing on a virtual machine. I'm running a Macbook as I abandoned Sharepoint after more than ten years and found myself writing code in all sorts of Javascript frontend frameworks. Therefore I do not needed a Windows machine anymore.
This post will guide you through the installation of a single server installation.
 So they're saying it is an easy install?! Let me give you the short version of it
YES! Installing Sitecore has never been easier I read on Twitter. Because I started to fiddle around with Sitecore just a few months ago and love reading manuals (which initially I never do) I got to install Sitecore about 20 times as I also installed the modules with SIM. When a colleague told me I would be better off using the install manager in Sitecore (SIM), I finally got a working version.
Let's cut to the chase and ignore all the stuff with loads of links and focus on the single server solution.
 What do we need
- SIF (Sitecore Installation Framework). Let's skip the 23 pages info and focus on the actions we need:
- Open a Powershell console in Administrator mode and execute the following command: Register-PSRepository -Name SitecoreGallery -SourceLocation https://sitecore.myget.org/F/sc-powershell/api/v2
- Run command Install-Module SitecoreInstallFramework
- If you want to check if it installs correctly then run Get-Module SitecoreInstallFramework –ListAvailable. This will show you (probably) the following screen:
Please note that for our installation we need to run SIF three times:
1: Configuring Solr,
2: Creating a Certificate,
3: The actual Sitecore 9 installation
- Solr: Download the one which is configured in your Sitecore 9 config which is 6.6.1. Download the zip from this location and unzip it somewhere on disk (e.g. c:\sol-6.6.1). Do not download the 7 version as you may get in trouble during the installation. The 7 version misses a directory which is needed by the installation. When you run into issues please check the Solving issues section. Solr needs to run as a service and by default it does not. Follow these steps for doing so. Make sure you have added the -f parameter otherwise Solr will not run in the background and may be become unresponsive during the installation of Sitecore.
- IIS ofcourse!
- SQL Server 2016 (Dev or Express edition). Windows AND SQL authentication.
- After installing SQL2016 you need to install SQL Management Studio. Then start the app, start a new SQL window and run the following query:
sp_configure 'contained database authentication', 1;
GO
RECONFIGURE;
GO
 Powershell, the installation of Sitecore 9
Because we are going to run Powershell, thus from command line, we have to get all the installation files and configurations together so we can do everything without jumping to other folders while installing.
For this I created a folder C:\sc9 in which I put all the files:
- license.xml - this license file ofcourse
- Sitecore 9.0.0 rev. 171002 (OnPrem)_single.scwdp.zip - For easy use renamed it to sc9.zip
- sitecore-solr.json - for configuring Solr
- xconnect-createcert.json - creating your certificate
- sitecore-XP0.json - Sitecore config
From here we're going to run the Sitecore Powershell Module 3 times :
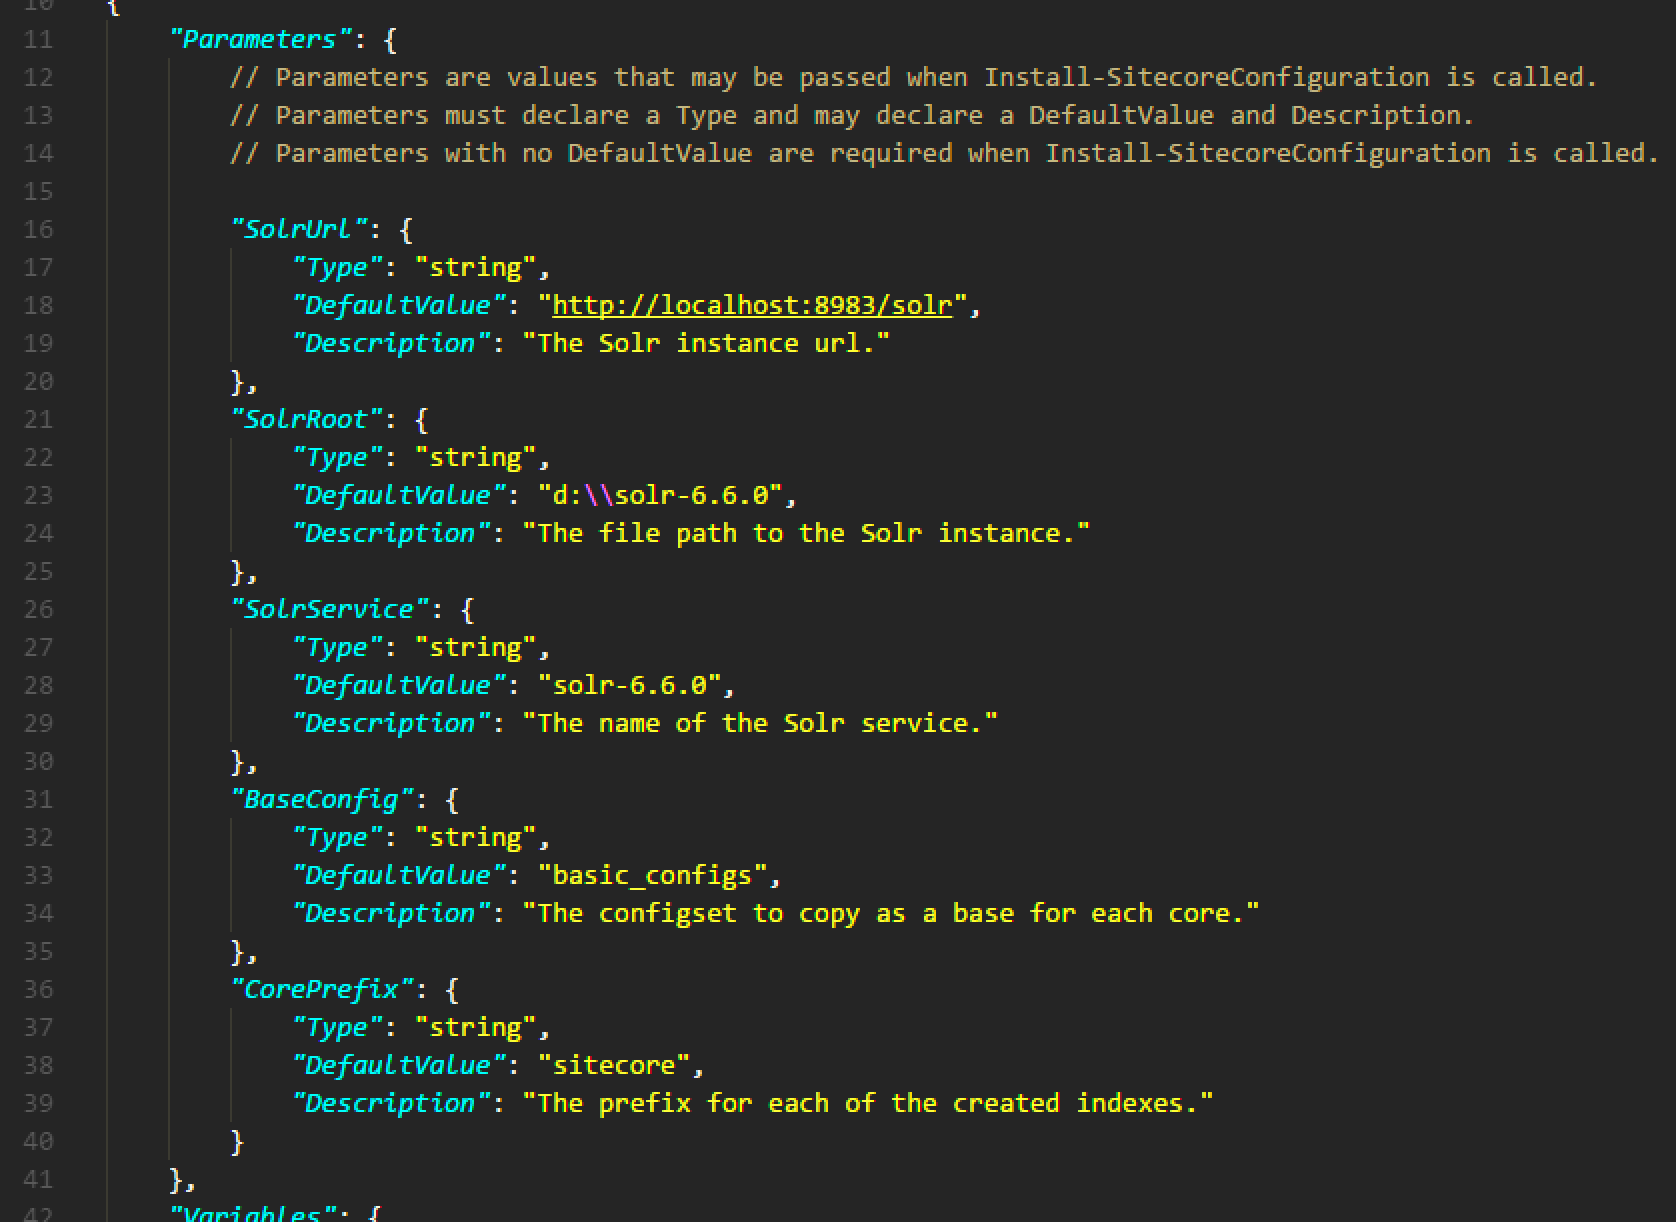
So the first thing is to configure your Solr server. We have to make some changes to the sitecore-solr.json configuration. In the top of this file there are some settings you can change. As an example you can see I used Solr 6.6.0 (had that installed already, didn't want to use a new version). The settings look like:

For you, three items are important:
- SolrUrl - by default this one refers to https, I changed it to http (I'm lazy)
- SolrRoot - the location where you extracted the Solr zip-file
- SolrService - This is the name of the service you created with the non sucking service install app
Now it's time to open PowerShell (as Administrator) and run:
Install-SitecoreConfiguration -Path .\sitecore-solr.json
Next we have need to create a certificate because the final installation script will need it. Lets create it by executing the following command:
Install-SitecoreConfiguration -Path .\xconnect-createcert.json
This command will ask you for a name for the certificate. Think of a funny name. Be creative!

Hit enter and sit back while a root certificate and your own certificate are created. When done open that folder in C:\certificates and double-click both files to install them (default locations is suitable).
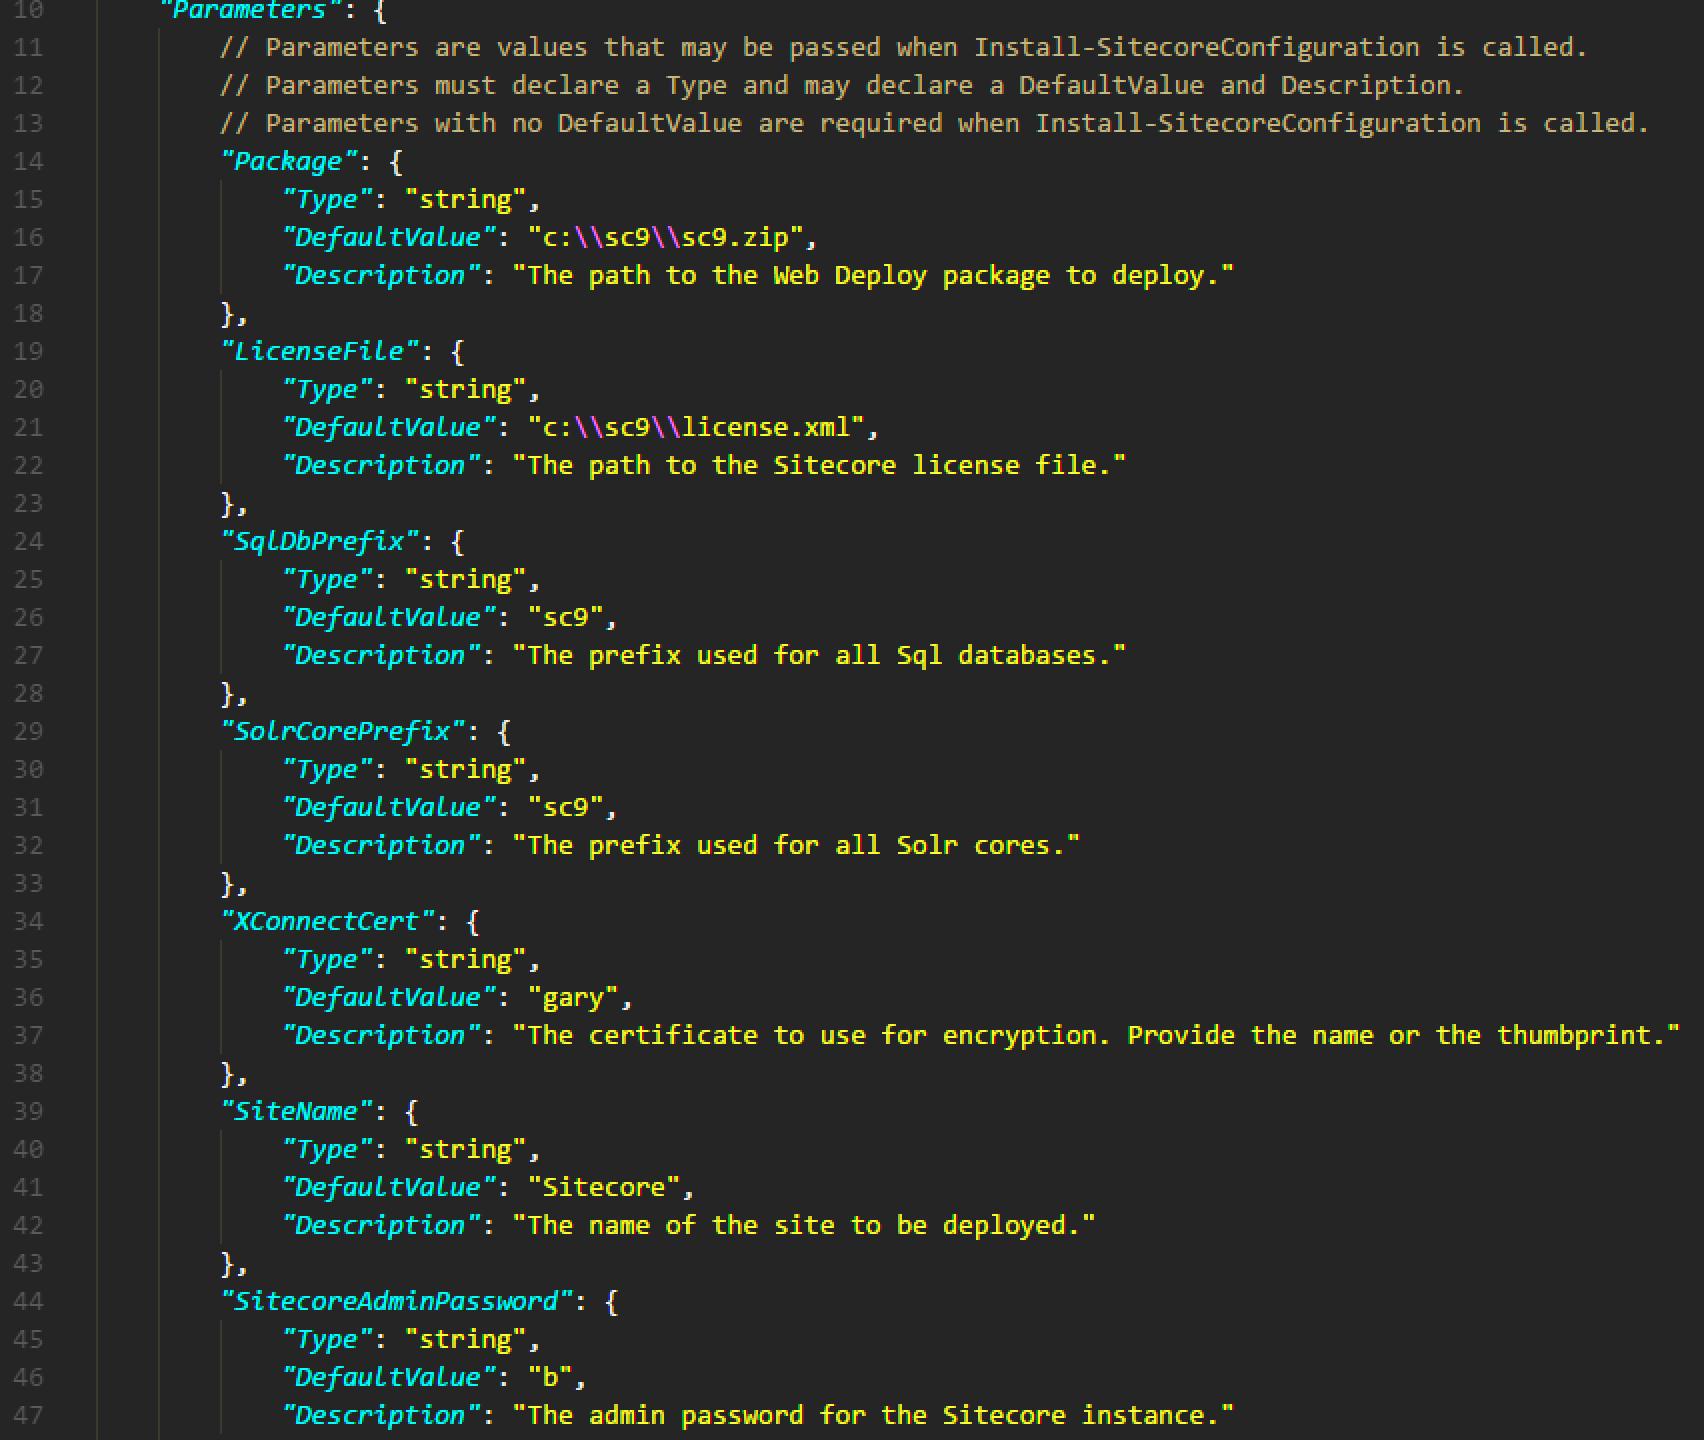
Then the final step is changing the sitecore-XP0.json file to fit your configuration. The parameters are:

- Package - This is the location where I put all the files
- LicenseFile - Also in the same folder
- SqlDbPrefix - I used sc9
- SolrCorePrefix - I also used sc9
- XConnectCert - This is the name you used when creating the certificate
Now it is time to run the command
Install-SitecoreConfiguration -Path .\sitecore-xp0.json
All of this was achieved after two days of sweating and bleeding from my eyes and ears, but in the end after re-tweaking it all came together. During the installation, ofcourse I hit a few walls. The installation guide gave me some insight :-)
 Got issues?
 Your have installed an older version of SQL Server and now install SQL2016 and your Sitecore installation crashes
You will get: SQL Server 2016: Please make sure that Microsoft SQL Server Transact-SQL ScriptDom is installed
So you have maybe an older version of SQL Server installed? I had 2012 and installed 2016 as './SQL2016' instance. That worked fine until I ran the Sitecore installation and told me: The SQL provider cannot run because of a missing dependency. Please make sure that Microsoft SQL Server Transact-SQL ScriptDom is installed. After an hour I found out it did not have to do with somekind of option pack. It's just that the assembly is not present in the GAC. Because you installed 2016 this means you have the file but it's not loaded in the GAC. I don't know why but this command will help you out:
"C:\Program Files (x86)\Microsoft SDKs\Windows\v7.0A\Bin\x64\gacutil" /i "C:\Program Files (x86)\Microsoft SQL Server\140\Tools\Binn\ManagementStudio\Extensions\Application\Microsoft.SqlServer.TransactSql.ScriptDom.dll" . (for you the files may be in a different location)
 Value cannot be null. Parameter name: fieldNameTranslator - Opening Content Editor
So all went right during the installation and you managed to log in to the new Sitecore 9!!! Cool! Did that too! But then when hitting the content editor I got a fancy error:
Value cannot be null. Parameter name: fieldNameTranslator - Opening Content Editor
Searching around I found (old) posts saying I had to change my global.asax. Please don't! Just re-run the former script and it will go away.
 Take aways
Today a colleague of mine wished he could go back in time and use SIM with one package and deploy Sitecore. As environments grow bigger and more complex it is a necessity to do more during the installation. Because of my experience over the last few years (since 2001) with SharePoint I know the extensive configurations, pitfalls and issues which lie ahead. And I am sure that you might come across other issues when installing Sitecore 9.
The only thing I know is that when I started a few months ago with Sitecore I became very happy discovering all the capabilities. And now with machine learning, JSS and all other cool new hot things I can only say:


Comments